Home Blog Page 22

50 Valentine’s Day Desserts For Your Loved One

0
Strawberry-And-Macadamia-crostata

Ending a perfect date on Valentine’s Day with your loved one with desserts is just a cherry on top. Sweets and desserts ignite romantic feelings between two persons and take things to a lighter mood. Women especially love to call it a day with a romantic dessert treat.

So if you want to light up the romance on your Valentine’s Day evening, then it is worth giving a try to desserts. The list of desserts for a romantic evening is quite extensive for different moods and tastes. The best fifty dessert options to try on a romantic evening date are shared here for you.

Perfect End To Your Date with 50 Valentine’s Day Dessert Treats

1. Lamington Cheesecake

The perfect taste of soft cream cheese in vanilla flavor is enough to bring sugary joy to your Valentine’s Day date. You can quickly get one at any bakery and enjoy it as you walk down the street together.

2. Tropical Tres Leches Cake

Valentine's Day Desserts On Valentine day

Combining the flavor of strawberries and cream along with fluffy bread, these cakes are worth a try. Filled with softness and loads of cheese, it is a perfect pick for romantic evening desserts.

3. Strawberry and Vanilla Jelly

Strawberry and Vanilla Jelly Valentine's Day Desserts

Who doesn’t love strawberries? The best way to end the evening is with a few strawberries ixed with vanilla flavor jellies dipped in sherbet of your choice. It is always a sweet surprise to have as a desserts.

4. Honey Joy Cheese Cake

Honey Joy Cheese Cake Valentine's Day Desserts On Valentine's Day

The best dessert for love, honey joy cheesecakes are loved across generations by people of all ages. This dessert is famous for its yummy taste and fun toppings that come on top.

5. Italian Baked Alaska

Italian Baked Alasks Valentine's Day Desserts on Valentine day

This dessert is made from Italian ice cream and fresh fruit. It is a combination of passion and sweetness, and this dessert will be one of your best romantic evenings ever.

6. Turkish Delight Cake With Strawberry And Pomegranate

A soft homemade strawberry caramik cake with fresh strawberries and pomegranate toppings is just a perfect Valentine’s Day dessert. You can also dress up the look of this Turkish cake by adding dark choco chips to it.

7. Spiked Hot Chocolate

Spiked Hot Chocolate

A spiked hot chocolate in a perfect blend of raw cocoa and coffee in a soothing drink on a romantic dinner. The warm taste of this dessert makes it an ideal choice for chilly evenings.

8. Southern-Fried Beignets

Southern-Fried Beignets

Mild French pastry always tastes fantastic, and this dessert will be perfect as your evening delight at home. You can also try Beignets dipped in yogurt to take things to a light refreshment area.

9. Banana, Peanut Butter And Caramel Mud Cake

Banana, Peanut Butter And Caramel Mud Cake

You might call it a day to end a romantic date with a butter cream cake combining peanut butter and bananas. The sweet smell of this dessert can keep your mind thinking about your lover all night long.

10. Chocolate Mousse Pie

Chocolate Mousse Pie

Mousse Pie is an excellent dessert on any day, especially on Valentine’s Day with your loved one. The best part, you don’t need an special occasion to enjoy its taste.

11. Corn Flake Lemon Meringue Tart

You can quickly get these delicious desserts at bakeries or make them at home in just one hour. A corn flake lemon meringue tart with berries can be a fantastic choice for a romantic evening date.

12. Crackle Marble Cake With Chocolate

You can quickly get this frosty dessert at bakeries or make it at home. Apart from the soft texture and flavor, this choco crackle marble cake is always attractive to look at.

13. Maple Syrup Pecan Pie

Maple Syrup Pecan Pie

The texture of this dessert is soft and gooey, making it a favorite among people who love sweets. The taste of the pie is also delightful, making it a perfect treat for your Valentine’s Day date.

14. Double Choc Mousse Cake With Whipped Vanilla Mascarpone

This dessert has a lot of childlike fun due to the delicious taste, the perfect sweetness, and the vanilla scent that can keep you going all night long!

15. Chai Latte Honey Mousse

Chai Latte Honey Mousse

Classic latte turned into a sweet dessert with a honey mousse chai latte. Try this creamy and sweet dessert if you want an additional taste of joy.

16. Hot Apple Cider

Hot Apple Cider

An evening without a couple is incomplete without hot apple cider. The taste of both the apple cider and the dessert together makes a unforgettable combination.

17. Hot Apple Pie

People have loved this delicious dessert for ages to end their romantic evenings with it. The best part about hot apple pie is that you don’t need an occasion to enjoy its taste as well as its warmth.

18. Chocolate Espresso Mousse Pots

Chocolate Espresso Mousse Pots

Warm mousse with a crunchy topping of the pie is a perfect choice for your Valentine’s Day evening. The warm and spicy taste of chocolate espresso will keep you joyful all night long.

19. Hot chocolate

Hot chocolate

This cool drink is made from hot chocolate and milk, and it is a simple treat that can be enjoyed by children and adults alike. Try it out with men on Valentine’s day.

20. Chocolate And Raspberry Mousse Cake

Chocolate And Raspberry Mousse Cake

A cake filled with Nutella inside and raspberry toppings in chocolate base makes for an amazing treat on Valentine’s Day or any other day of the week.

21. Hazelnut And White chocolate mousse cake

Hazelnut And White chocolate mousse cake

A white chocolate mousse cake is a treat that couples of all ages enjoy. You can also try this dish with some fresh fruits like blueberries or strawberries.

22. Ice Cream Sandwich

Ice Cream Sandwich

This dessert you can enjoy as much as you want and still feel satisfied as it is not laden with calories or sugar. Ice cream sandwiches will never fail to impress your loved one on a date.

23. Lamington Cookies

Lamington Cookies

A lamigton cookie is a simple treat that everyone can enjoy. The best part about these cookies is that you don’t have to wait for an occasion to enjoy them or have them as a dessert.

24. Cashew Cake With Chocolate Base

Cashew Cake With Chocolate Base

This sweet dessert has bite-sized pieces of cashew nuts in it, which give it a different and more delicious taste than any other dessert in the market today.

25. White chocolate and Hazelnut Mousse Cake

White chocolate and Hazelnut Mousse Cake

This mousse cake is made with hazelnut and chocolate filling topped with brownie topping. It is a perfect choice for people who love sweet and creamy desserts.

26. Chocolate Chestnut Log

Chocolate Chestnut Log

Crunchy chestnuts dipped in melted chocolate make a perfect combination for winning your partner’s heart. Creamy chocolate and crunchy nuts, give it a great taste for a desert.

27. Oven-Baked Strawberry Tart

Oven-Baked Strawberry Tart

Oven-baked tarts are simple, sweet and delicious recipes to end your romantic evening date. It  only requires little time and efforts to make it.

28. Chocolate And Strawberry Mousse Cake

Chocolate And Strawberry Mousse Cake

You can easily find this dessert at bakeries or make it at home. The combination of chocolate and strawberry makes for something you won’t forget about once you taste it.

29. S’mores Cake

S’mores Cake

A delicious soft chocolate cake, crunchy hot cocoa marshmallows, and two graham crackers make for a tasty dessert that you may want to try on that special day of the week or whenever you wish to eat something sweet!

30. Mango And Lime Meringue Pie

Mango And Lime Meringue Pie

This has a lot of flavor in its taste, and it is loved by those who love mangoes and desserts. If you’re the guy of the family, you can always add some chocolate chips to garnish your pie.

31. Double Chocolate Mousse Cake

This mousse cake has melted milk chocolate spread all over it, making it a perfect treat for any occasion or weeknight. The best part about this dessert is that you can even make it in advance and enjoy eating it on a special night.

32. Israeli Milk Pudding

Israeli Milk Pudding

This one will taste sweet and delicious due to strawberry and almonds with glaze of delicious vanilla cream.

33. Strawberry-Almond Bostock

Strawberry-Almond Bostock

This sweet dessert is a perfect choice for Valentine’s Day date. The strawberry and almond flavors, along with the crunchy almond topping, makes for a dish that you will remember for years to come.

34. Strawberry Sparkling Wine Jellies

Strawberry Sparkling Wine Jellies

This dessert is creamy and delicious. You can use this to impress your loved one on Valentine’s Day or any other day you want to spend some time alone with them!

35. Chocolate lava cake

Chocolate lava cake

A chocolate lava cake is just another name for the molten chocolate cake, which everyone loves desserts or chocolate in general.

36. Strawberry And Macadamia crostata

Strawberry And Macadamia crostata

This dessert will make you feel happy on your special day with authentic taste of Italian dessert. The unique taste of strawberry and macadamias is something that almost everyone loves to admire.

37. Hot Chocolate Fudge Sundae

Hot Chocolate Fudge Sundae

A sauce of hot chocolate poured on top of a melting ice cream sundae will give you and your loved one a classic treat that takes excellent memories to enjoy again with the person who makes it for you!

38. Baked Lemon Meringue Pie

You’ve probably had this dessert on many occasions as it goes well with any meal or occasion. The lemon flavor is something that everyone can enjoy.

39. Fruit Slice With Custard

Fruit Slice With Custard

A custard is a dessert that consists of eggs, cream, and sugar blended into a fluid state and then baked in the oven. This recipe takes no time at all to make, and it’s easy to eat as well.

40. Butterscotch And White Chocolate Shortbread

Butterscotch And White Chocolate Shortbread

These cookies are deliciously sweet, crispy, and crunchy, just you the perfect sweet snack for your first date! Try this out, especially if you want the person to know how much you love them!

41. Norwegian Meringue Cream Cake

This dessert must have been invented in Scandinavia and represents the ultimate expression of Norwegian culture. It is a dish that adorns the love between two people and brings them closer.

42. Baked Chocolate And Ricotta Cheesecake

Baked Chocolate And Ricotta Cheesecake

This cake has got a rich texture and an intense flavor. The chocolaty flavor you can get from this dessert can put the person on the moon, especially if they like fruits!

43. Danish Lemon Moon cake

Danish Lemon Moon cake

This one tastes better when baked, so it’s a good idea to make it in advance. You can serve it to your loved one on a particular day of the week or just whenever you want to bake something sweet!

44. Kladdkaka

Kladdkaka

The slight stocky and gooey flavor of this cake is an unique taste achieved by keeping it slightly undercooked. Try out this Swedish recipe for yourself or someone special to you!

45. Flourless Chocolate Orange Cake

Flourless Chocolate Orange Cake

The combination of chocolate and orange makes this a top choice for dessert that everyone will love due to its tastes which can be found in any other kind of pie but not the pumpkin one!

46. Malt Chocolate Cake

Malt Chocolate Cake

This dessert is sweet, moist, and tasty. It’s something that looks like choco lava cake but tastes completely different that you won’t forget!

47. Black Forest Mud Cake

Black Forest Mud Cake

The sweet, tasty, and deliciousness of chocolate can never be replaced by anything else.  Try new flavors of chocolate in the black forest mud cake with someone you want to remember for years!

48. Persian Love Cake

Persian Love Cake

If there is one cake that everyone loves to eat, it is the Persian love cake. This dessert is something that any woman would want to eat and enjoy.

49. Christmas Trifle

Sweet, tasty, and delicious strawberries with jelly are the perfect partner to accomplish on your Valentine’s Day date.

50. Malted Forever Brownies

Malted Forever Brownies

This is a tasty brownie with a creamy marshmallow sauce that you can put on top of it. The chocolate flavor makes this dessert as good as it sounds and is a terrific choice for any occasion!

A compilation of the fifty best tasty desserts for Valentine’s Day is shared here. You can try anyone from this list and make your evening unforgettable while talking with your loved one over the dessert. Some of these are also a great option to try if you want to bake something for someone special.

Baked And Delicious Pumpkin Fries: Complete Recipe

0

Pumpkin fries are a brilliant fall treat that is just right for the season. Cook up these sweet pumpkin fries to share with your friend’s family, or keep them for yourself! The kids will love this recipe as well. They’ll think you are some sort of culinary wizard because these pumpkin fries taste so good, and you made them at home! And don’t worry about eating loads of fat from frying, as you can now bake your pumpkin fries to avoid using oils for cooking. So enjoy your healthy and delicious pumpkin fries!

Delicious Pumpkin Fries

Ingredients Required

Before jumping to the recipe, you need to set up a few essentials for making crunchy fries at home.

The list includes one large Pumpkin (about 2 ½ pounds), 1-2 tablespoons of olive oil, three tablespoons of honey, half a teaspoon of paprika powder, and chili flakes if you like to add spicy and smoky flavor to it.

  • 1 pumpkin
  • 1/2 teaspoon paprika powder
  • 2 dashes powdered cinnamon
  • One And half teaspoon cumin
  • 1/2 teaspoon thyme
  • One And Half teaspoon sage
  • 2 tablespoon virgin olive oil
  • 1/2 teaspoon chilli flakes
  • 1 teaspoon garlic powder
  • 1/2 teaspoon basil
  • 1/2 teaspoon parsley
  • salt as required

Some spices are also needed, including half a teaspoon of garlic powder and cumin, basil leaves, some parsley, sage, and salt to taste. Once you are set with all the ingredients, you can continue with the step-by-step guide to making pumpkin fries at home.

Step – 1

Wash and scrub the Pumpkin thoroughly to remove all the dirt and debris. Next, remove all the seeds from the Pumpkin. It is important to clean off the dirt particles from your Pumpkin first. Then go on to cut the trimmed Pumpkin into large fries. Use a slicer or an electric hand-held pastry blender to make uniform, even strips. It is the shape that makes them attractive, and to get proper shape give chopping proper attention.

Step – 2

Now go peel off the Pumpkin using a peeler and then chop it into the shape and size like that of fries. Then take this chopped into a medium-size bowl and sprinkle olive oil over it. Toss these fries properly to coat all the fries with olive oil. Be careful about not pouring too much oil as it will make the pumpkins greasy.

Step – 3

Toss all the herbs and spices into this bowl and mix them properly. With the previous coating of olive oil, the spices will just stick to the surface of pumpkins. These herbs will give an additional smoky and spicy flavor to your fries. You can also add a little bit of honey because it is thicker, but try not to use too much because it will affect the taste. You can alter the number of spices as per your taste and convenience.

Step – 4

Preheat oven to 400F. Line baking sheets with parchment paper, or skip this step using a nonstick pan or shelf. Spread the fries on the lined baking sheet in a single layer. Bake for 20 minutes on each side, or until they are crispy and golden brown. Now, serve the fries hot and enjoy your homemade pumpkin fries!

10 Homemade Baby Food Ideas – Easy To Apply!

0

Feeding babies is quite a challenging task as they don’t eat only a few spoonful’s, making it difficult to ensure proper nutrition. However there, few ideas out there to help moms provide only the best nutrition for their babies. Rather than buying food for you little one from the market, you can now make healthy food for your babies at home. There are some great baby food ideas to ensure healthy and complete nutrition for your babies to conquer this challenge. Take a look at the top 10 easy but nutritious and healthy homemade food ideas for your baby.

1) Mild Vegetable Soup

Mild Vegetable baby Food Ideas

This recipe is loaded with vitamins A, B’s, C’s, and E. It also contains such vitamins as folic acid and a few essential minerals for your baby.

Ingredients

  • Fresh vegetables like tomatoes, peas, carrots, or almost any vegetables except chilies.
  • Few chickpeas if you like.
  • One cup of water.

Procedure

Start by cleaning and chopping the vegetable into smaller pieces. Next, put chickpeas and water in a pan at medium flame. After 30 minutes, add a vegetable and cook it to make soup. Filter out the vegetable and feed the soup to your baby after cooling it down.

2) Banana, Apples, and Peaches

Banana, Apples, and Peaches baby Food Ideas

This is a popular baby food recipe that is quite easy to make. It’s also very healthy for your baby. Fruits are a great source of minerals and essential vitamins for ensuring proper growth for your baby.

Ingredients

  • 4 tbsp. applesauce (jarred or homemade)
  • One small banana, peeled and cut into 1/2 inch pieces
  • One small peach, peeled and cut into 1/2 inch pieces (frozen are fine)

Procedure

Add all ingredients to a pot and cook on high for 30 to 30 minutes. After cooking, mash the fruits and vegetables with a fork and serve.  

3) Homemade Avocado Puree

Homemade Avocado Puree Food Ideas

Avocado is a fruit that is one of plenty of vitamins and minerals for your baby’s sensitive digestive system. Avocado puree is a great low-allergic food for infants and kids of 2-3 years of age.

Ingredients

  • One ripe avocado, peeled, pitted, and cut into 1/2 inch pieces
  • Dash of salt

Procedure

Add your peeled Avocados into the blender and blend them enough to make a thick and smooth mixture. Then, your puree is ready to be served, and the best part is that you can also store it for future use.

4) Kiwi Puree

Kiwi is a good source of vitamin C and beta carotene. So if you want to introduce flavor to your little one, Kiwi Puree can be the perfect option for you.

Ingredients

  • Two ripe kiwis peeled and sliced into 1-inch pieces
  • 1/2 cup orange juice (freshly squeezed)

Procedure 

Take a pot and add the ingredients; cook on high for 3-4 hours. After cooling it down, use a blender to make a light paste.  

5) Mango and Banana Puree

Mango and Banana Puree

Mango and banana puree is another great recipe for your baby. It contains lots of vitamins, especially vitamin A and C.

Ingredients

  • Two ripe mangoes peeled and cut into 1-inch pieces
  • one large banana, peeled and cut into 1-inch pieces 2 tbsp
  • orange juice (freshly squeezed)

Procedure 

Add all ingredients to your cooking pot and cook on high for 3 hours. After cooking for 3 hours, mash the fruits and vegetables with a fork and serve. Yield: 2 servings

6) Sweet Peas and Carrots

Sweet Peas and Carrots

Sweet peas are very healthy, with plenty of vitamins and minerals. They help increase appetite among kids and account for all the requirements of your baby boy.

Ingredients

  • one pound fresh shelled sweet peas
  • one medium orange or some tangerine, peeled and segmented
  • 8 ounces carrots, peeled and cut into bite-sized pieces

Procedure 

Place a cooking pot on medium flame and put all the ingredients, including water. After cooking for 3 hours, mash the fruits and vegetables with a fork so that it’s easy to serve.

7) Banana and Strawberry Puree

Banana and Strawberry Puree

Banana packs lots of vitamins and minerals for your baby in its soft texture. Meanwhile, strawberries contain plenty of vitamins that your baby needs.

Ingredients

  • Three large bananas, peeled and cut into 2-inch pieces
  • 2 cups seedless grapes 1/2 cup nonfat yogurt (low fat is fine)

Procedure

Mix everything in a pot and cook for around twenty minutes on medium flame. Once everything is cooked, mash the fruits and vegetables with a fork, so it’s easier to serve.

8) Pineapple Puree

Pineapple Puree

Pineapples are one of the healthiest fruits for your baby as it is packed with lots of vitamins.

Ingredients

  • 4 cups fresh pineapple, peeled and cubed
  • Water 1/2 cup (adjust quantity as per your baby’s appetite)

Procedure

Add the fruit and water to a pot and cook on a medium flame for 2 hours. After cooking, mash the fruits and vegetables with a fork so that you can feed your child easily after cooling down. Yield: 2 servings

9) Whipped Peanut Butter

Whipped Peanut Butter

Whipped peanut butter is made by mixing the peanuts and honey mixture until it becomes a smooth mixture. Peanuts are packed with minerals and vitamins that your baby needs.

Ingredients

  • 1/2 cup peanut butter whipped and ready to serve.
  • One tbsp honey.

Procedure

Mix all the ingredients in a bowl stir well until completely blended. Scoop out the peanut butter mixture into a serving spoon and serve your baby. Yield: 6 servings.

10) Grape Delight

Grape Delight

Grape is a healthy fruit that is essential to make your baby healthy. It contains lots of vitamins little ones need as an energy source throughout their growth period.

Ingredients

  • Few ripped grapes, peeled and mashed.
  • Few tablespoons of honey.

Procedure

Add these peeled grapes into a small bowl and make a smooth paste. Next, you can add honey to give it a sweet taste.

Conclusion

Nutrition is very important for all growing babies. No matter how much they roll their food and even avoid eating, you can’t stop feeding them until they leave the breast milk diet. Go on try out these baby food recipes and find out what your baby like the most.

Sheet Pan Nachos: An easy and quick recipe

0

Sheet pan nachos are always a big thing in my family. Rising up, our house was the hang-out place for all of my friends. It is something that my mom utilized to make us that it will provide a large group of kids was sheet pan nachos. Topping them off with homemade Quick Pickled Onions.

Table of Contents

  • Top Ingredients Needed for Sheet Pan Nachos
  • Mexican Style Chicken Tips
  • Tips on Ingredients for Making Nachos
  • Tips to making the best One Sheet Pan Meal 
  • FAQs on Sheet Pan Nachos
  • Other Recipes to Try
  • Loving this Recipe?

Top Ingredients for Sheet Pan Nachos

Normally, the more okay the ingredients are, the more pleasing your food will taste. I will go into detail about each ingredient. What is most suitable to get high quality? What amazing items to look for, and what things can’t be replaced? Not all things will have notes.

Mexican Style Chicken Tips

– Avocado Oil: 

I myself like avocado oil and use this to make sauté pans. Nevertheless, you can use olive or vegetable oil.

The smoking pinpoint will revise, so pay close watch. Olive oil has a 410° F smoking endpoint and avocado oil has a 520° F smoking point. This means that olive oil will burn at a more inferior temperature/time on the stove.

– Chicken Breasts: I am using chicken breasts as I see they are the most effortless to slice. Yet, you can do this with thighs. Or actually with jackfruit for a vegan/vegetarian version.  

– Fajita Seasoning: 

You can use a store-bought arrangement in a packet or jar. Also, you can create your own. I have a recipe on my place you can use!

– Salsa: 

I used mild salsa. Hence, you can use whatever is your dear. I mainly like something spicy, but I was adding in jalapenos. So, modify as you like.

– Adobo Sauce: 

This can be a choice if you don’t like very spicy foods. I utilize the cans of chipotle peppers in adobo sauce. Then I use the scraps for other recipes like my spicy turkey burgers.  

Tips on Ingredients for Sheet Pan Nachos

– Beans: 

You do not have to use black beans. But, these are my favourite. Sense free to switch in refried or whatever drifts your boat.

– Kale: 

This is a great yes for me. My friend oriented me to kale on nachos. For me, life hasn’t existed the same since. The kale gets crisp and tasty. It drives me to feel like they are more nutritious.

– Pickled Onions: 

I adore a good pickled onion. They are so simple to make. Here is the recipe of Quick Pickled Onions.

Tips on how you can make the best One Sheet Pan Meal 

These suggestions are useful when you are creating the recipe. Outside of the recommendations for ingredients above. These are suggestions on how to do something or why what I’ve detailed in the recipe is vital.

– Shredded Chicken: 

I personally enjoy making mine in advance as I don’t like to have to make all these things at the exact time. You can cook it a couple of days in advance. Then, store it in the fridge. You will also have some scraps, which can be excellent for making these nachos double the recipe for a bigger gathering. Or you can utilize it on salad, in quesadillas, etc.  

– Cheese: 

The layering of cheese on the base and top is super crucial to get things to stick together. It works as an ingredient glue sandwich. Be sure you layer perfectly, as per the instructions below.  

– Assembling: 

After making your nachos comes the fun part. If you like, you can make all the toppings right on top. Or if you have choosy people you’re eating with, only make little bowls of all the toppings and let people layer what they like on top.

FAQs about Sheet Pan Nachos

How can you make sheet pan nachos with liquid queso?

Sure. I will heat it individually and add it on top at the end. Can you cook sheet pan nachos vegan or vegetarian?

Yes, use your favourite dairy-free cheese. Use jackfruit as your protein substitute. Schedule it nearly the same as chicken, but I advise rinsing and parching it first.

Ingredients

Nacho Ingredients

  • ▢1 lb of cooked chicken
  • ▢½ cup of salsa your favourite brand
  • ▢9 oz of Tortilla chips
  • ▢12 oz of shredded Mexican cheese
  • ▢2 cups of kale loosely packed
  • ▢15 oz of black beans pre-cooked

Nacho Toppings Ingredients

  • ▢1 avocado sliced and properly cut
  • ▢¼ cup of pickled onion*
  • ▢1 jalapeño sliced
  • ▢¼ cup of cilantro
  • ▢1 lime cut into wedges
  • ▢2 Radishes properly sliced
  • ▢1 cup of cherry tomatoes halved

Instructions

Nacho Instructions

  • Preheating the oven to 350° F. Then, take out a big-lipped baking sheet. You can organize it with parchment paper or leave it as is.
  • Slice the cooked chicken with a fork or use a paddle extension on your stand mixer. Add in salsa and swirl well.
  • Spread a hefty layer of tortilla chips. Take half of your cheese and spread it across the chips evenly. Then evenly lay out your kale, beans, and chicken. Then complete off with the remaining cheese.
  • Bake for 10-12 minutes. Maintain a close eye on them so you don’t burn your nachos.
  • Eliminate from oven and top with all or whichever toppings you would like to add extra. Serve and relish!

Notes

– Shredded Chicken: I suggest just purchasing pre-cooked chicken to slice down on time. But if you like you can make your own chicken as well. Just obey the same instructions post-cooking. 

– Cheese: The layering of cheese on the bottom and top is very essential to get things to stick together. It works as an ingredient glue. Be certain you layer correctly, as per the instructions below.

– Assembling: After baking your nachos arrive at the fun part. If you like, you can make all the toppings right on top. Or if you have choosy people you’re eating with, just create little bowls of all the toppings and let people layer what they enjoy on top.

Nutrition

Calories: 662kcal | Carbohydrates: 54g | Protein: 32g | Fat: 37g | Saturated Fat: 13g | Polyunsaturated Fat: 7g | Monounsaturated Fat: 13g | Trans Fat: 1g | Cholesterol: 81mg | Sodium: 767mg | Potassium: 872mg | Fiber: 12g | Sugar: 3g | Vitamin A: 3011IU | Vitamin C: 43mg | Calcium: 522mg | Iron: 4mg

All nutritional information is established on third-party calculation. These are only estimates. Exact nutritional content will change with brands used, calculating methods, portion sizes, and more.

Japanese Okonomiyaki recipe: A must-try dish

0

Okonomiyaki is one of Osaka’s ( Japanese) most well-known dishes. It is well flavored pancake consisting of eggs, cabbage, flour, pork belly and different-2 toppings. Yet, as you journey throughout Japan, you will find that each region has a diverse style of okonomiyaki. 

Easy Japanese Okonomiyaki recipe

Ingredients Required

  • 200g of flour
  • 200g of dashi
  • 6cm Nagaimo: grated
  • 3 eggs
  • 1/4 cabbage head
  • Favored fillings (pork, seafood etc.)
  • Pinch of salt

1. Cut the cabbage into 3 cm long or into thiny slices (0.3 CM)

2. Mixing the flour in the bowl and then the dashi and egg.

3. Peeling and grating the nagaimo. It is quite slim so I would suggest peeling just the bottom half of the nagaimo. So, that you can get a good grip from the skin. If not possible, try to use a kitchen glove or paper towel.

4. Adding the nagaimo and cabbage into the flour mix.

5. Heating your fry pan or hot plate on medium heat, approximately 170 degrees celsius. Then add some vegetable oil. (Canola oil is okay as well!)

6. Add just 2 ladles of dough to the frying pan.

7. Place your favourite ingredients on top (pork, prawns, squid, anything is okay!

8. If the bottom is golden brown, you can flip over. By this time, your topping ingredients should be mixed with the batter so it is easy to flip over.

9. Wait till the flipped side is golden brown . Then you can serve on a plate or just in the frypan or hot plate to keep warm.

10. For the sauce, the ordering is very vital. First, the okonomi sauce is added. Then the mayonnaise in a zigzag pattern. The nori is added and then the katsuobushi. (I didnt have any nori so I went for some shiso instead. 

11. Enjoy!

Easy Japanese Okonomiyaki recipe – Toppings

To form a good taste toppings of okonomiyaki are important.

1. Okonomi Sauce

This sauce is sweet and has a strong umami flavour. It can be seen in most Asian supermarkets. Nevertheless, if you want to try your own, you can use ketchup, Worcestershire sauce, oyster sauce and sugar. easy okonomiyaki

2. Kewpie Mayonnaise

Japan’s most favorite mayonnaise, made by kewpie, isn’t like your regular mayonnaise. One of the major differences in the usage of egg yolks rather than whole eggs contributes to a rich and creamy mayo.

The use of rice vinegar delivers a punchier kick and the final drizzle of MSG adds the extra umami flavour. This mayonnaise forms a superb balance between the sweet and umami-packed okonomi sauce. Also, the creamy mayonnaise. Likewise, it has a short nozzle to spray through. It gives the okonomiyaki its different zigzag appearance. 

3. Dried Seaweed (nori)

There are various types of seaweed but the one used for okonomiyaki is known as Nori in Japanese. Nori sort of acts like a herb. You can spray nori on the top of the okonomiyaki. The unusual smell and fragrance on top of the umami point gives an important topping. 

4. Katsuboshi

Katsuobushi is the last topping. Katsuobushi is fermented and dried bonito fish. Then, it has been shaven into flakes, delivering a deep but fine taste of fish.

The katsuboshi has to be added last because as it beats the steam from the okonomiyaki. The bonito flakes begin to move as if they were dancing. Not just it gives a dramatic display but also points to the appetite, offering a freshly made, hot okonomiyaki.

5. Others

Toppings are endless so sense free to test with anything that suits your fancy. Some of my favourites are spring onions, shiso and pickled red ginger.

Spring onions and pickled red ginger (‘Beni sugar in Japanese) give a nice crunch and freshness allowing to cut via some of the heftiness of the batter.

Shiso is a Japanese herb, which has a special flavour, with tones of basil, mint and star anise. Its fragrance and brightness is a lovely difference from the meatiness of the pork.

At most restaurants, you can select which type of okonomiyaki you would like, with various ingredients.

You will then be capable to cook it yourself with a hot plate in the middle of your table. A step-by-step manual is available so you can track it as you go through it. Although it’s rather hard at first to get the picture-perfect okonomiyaki. It is wonderful entertainment for dates and dinner with friends or family. At some higher-end restaurants (Teppanyaki restaurants) you may be placed in front of the chef who owns the hot plate. 

Fuugetsu

Fuugetsu is a chain restaurant. It can be found all over Japan. It is a classic restaurant and delivers standard okonomiyaki but is done very well.

The staff makes your okonomiyaki for you in their kitchen and as such.

You can ensure it will be done with the proper methodology and preparation so it is less nuisance.

Italian pasta(Classic Baked Ziti) recipe, how to make it?

0

Friendly and soothing, this is an effortless classic Italian Baked Ziti recipe. It is served with Italian Sausage, tomato sauce, and cheese to the most. This recipe is quite kind with a side of Homemade Garlic Bread.

Italian Baked Ziti | A Classic Dinner

Adore Lasagna but hate the time it takes to make it? Baked Ziti delivers all of the same flavors and ease that lasagna does except with way less struggle.

Meaty tomato sauce, fill pasta, and all of that thawed gooey cheese. Today’s classic Baked Ziti recipe creates a large 9×13 pan. It is ideal for big families or to use as scraps.

Main Ingredients Needed for Italian Ziti

With a pair of pantry staples, you can keep this Baked Ziti recipe ready for dinner tonight. Here is what you will require:

  • Ziti Pasta – this is only a typical pasta shape, penne will work quite well in its place.
  • Sweet Italian Sausage – I utilized sweet Italian Sausage here though feel free to use calm or hot!
  • Olive Oil, Onion + Garlic – these three are employed with the sausage to add some fine flavors.
  • Marinara Sauce, Tomatoes + Water – this 3 drive up the sauce. I utilized store-bought marinara sauce (Rao’s). It’s slightly costly despite so worth it.
  • Oregano, Basil, Bay Leaves, Salt + Pepper – these spices and condiments help flavor the sauce.
  • Mozzarella + Part-Skim Mozzarella – I utilized a mix of full fat and a lower fat mozzarella in this recipe. Do not worry, it always tastes amazing.
  • Parmesan – I also utilized parmesan for a wee bit more cheesy oomph.

Baked Ziti Variations

Everyone has their covert tips and tricks in making Baked Ziti their own. In my house, I promote it. Feel free to utilize my recipe as a base. Then, customize it to your taste. Here are many alternatives to get you begun:

  • Vegetarian Baked Ziti: feeling free to make this a vegetarian dish by ditching out any meat products. Then, supplement it with more additional veggies.
  • Adding Vegetables: you can simply use vegetables in this dish. Regard wilting spinach, add shredded zucchini, or sliced carrots to this dish. You can also help your vegetables on the side.
  • Using Different Meat: Though I use a pork Italian sausage for this baked ziti recipe. You can simply substitute it with base beef or ground turkey.

How you can Make Italian Baked Pasta/Ziti

For complete facts on how to make baked ziti can be seen in the recipe card down below 🙂.

Step 1: Boiling the Pasta

Bring a large pot of salted water to boil. Cook ziti according to package directions. Drain and set aside.

Step 2: Browning the Meat

In other pot or deep skillet with tall sides, warming the pan over medium heat. Brown sausage, splitting apart as it boils. Drain if you like. Substitute back in the pan. To the boiled sausage, add olive oil, onion, and garlic and saute until mainly delicate.

Step 3: Make the Sauce

Start in chopped tomatoes, marinara sauce, water, basil, oregano, bay leaves, salt, pepper. Mix well. Cover and simmer. Flavor sauce and modify seasonings. Empty bay leaves.

Adding boiled ziti to the sauce and churn to coat. Adding in new mozzarella and parmesan cheese. Prompt to melt slightly.

Step 4: Bake

Pour into lightly oiled 9×13 pan. Spread with shredded mozzarella cheese, cover with lightly oiled foil and bake. Top with diced parsley (optional) and serve hot.

Storing Italian Baked Ziti

Baked Ziti will survive in the fridge, in an airtight container, for 4-5 days! Which implies it’s great for scraps and meal prep. In another way, you can make two batches and freeze one part for later!

Freezing Instructions

One of the finest parts about Baked Ziti is that it can be frozen. Frozen to survive even lengthy and make an awesome comfortable dinner for the future. I love when that occurs!

Just fold the recipe, bake one part, and with the other stock in a freezable container before baking. Be certain to cover tightly with aluminum foil. Wrapping it in a plastic sheet before freezing. Then, Freeze for up to 3 months.

When keen to bake, thaw in the fridge overnight then bake consequently.

Test this Baked Ziti soon, I know you will adore it!

The recipe card is down below, enjoy 🙂.

Classic Italian Baked Ziti

Warm and soothing this is an easy-to-make classic Baked Ziti recipe. It is served with Italian Sausage, tomato sauce, and cheese.

SERVINGS: 8 servings 

PREP TIME: 20 mins 

COOK TIME: 1 hr 

TOTAL TIME: 1 hr 20 mins

Ingredients

  • ▢1 lb of ziti pasta
  • ▢1.25 lbs of Sweet Italian Sausage
  • ▢2 tablespoons of olive oil
  • ▢1 onion diced
  • ▢3 cloves of garlic minced
  • ▢25 oz of marinara sauce I used Rao’s
  • ▢14.5 oz of petite diced tomatoes
  • ▢Cup of water (1)
  • ▢1 teaspoon of dried basil
  • ▢1 teaspoon of dried oregano
  • ▢2 bay leaves
  • ▢salt and pepper to taste
  • ▢8 oz of fresh mozzarella drained and cut into cubes
  • ▢1/4 cup of parmesan cheese
  • ▢1 cup of part skim mozzarella shredded

Instructions

  • Bring a big pot of salty water to cook. Cooking ziti according to packet directions. Sap and put aside.
  • In other pot or profound skillet with tall sides. Heating the pan about medium heat. Brown sausage, splitting apart as it boils. Sapping if you like. Return back in the pan. To the boiled sausage, add olive oil, onion, and garlic and saute until it becomes delicate for 3 minutes.
  • Churn in chopped tomatoes, marinara sauce, water, basil, oregano, bay leaves, salt, and pepper. Mix well. Cover and steam for 30 minutes. Tasting sauce and adjusting seasonings. Clear bay leaves.
  • Adding boiled ziti to the sauce and mix to coat. Add in new mozzarella and parmesan cheese. Stir to melt a little. Pour in lightly oiled 9×13 pan. Spread 1 cup sliced mozzarella cheese. Covering it with lightly oiled foil and bake at 350 degrees for 20-30 minutes. Complete it with diced parsley (optional) and serve hot.

Nutritional Information

Calories: 665kcal | Carbohydrates: 54g | Protein: 31g | Fat: 36g | Saturated Fat: 14g | Cholesterol: 87mg | Sodium: 1370mg | Potassium: 817mg | Fiber: 5g | Sugar: 9g | Vitamin A: 785IU | Vitamin C: 14mg | Calcium: 356mg | Iron: 4mg

Course: Dinner 

Cuisine: Italian

Chicken Fried Steak food recipe, how to make it?

0

The Chicken Fried Steak is roasted to golden yellow perfection. Then, it is ended with the creamiest gravy you can picture. It is surely evolving family favored.

It is difficult to picture a more ideal Southern meal than Chicken Fried Steak and Gravy. The challenging part is deciding whether you want it to be for breakfast or dinner?

Chicken Fried Steak

I gathered it was high time I share my all-time favorite recipes with you fellas. I have been consuming this Southern food classic for a long. This truly is the best chicken steak recipe out there.

Chicken Fried Steak: Is it good for Breakfast or Dinner?

There is nothing particularly like chicken fried steak when it reaches versatility. We love to serve it for dinner with smashed potatoes and gravy. If it is for brunch we desire, serving this yumminess with a pair of sunny-side-up eggs and hash browns still do the trick.

How to perfectly Season and Flavor ?

Each layer of this Chicken Fried Steak recipe is flavored to perfection. The steaks are spiced with salt and pepper. The flour mix is flavored with herbs and spices. Even the buttermilk and egg batter are spiced with TABASCO® Sauce.

I adore the different flavors it counts to this recipe. If you are nervous about it being spicy then do not. It truly doesn’t add any heat to the dish. But it fetches other flavors in the dish.

Why is it named Chicken Fried Steak?

Chicken Fried Steak is not created with chicken. In it, no chicken is seen. It is named this because the steak is bread and fried. Exactly like you will a piece of chicken. Chicken Fried Steak is created with cube steak. You will find it already tenderized at your grocery store.

Then rear into the flour one last time. Eventually, it fried to yellow golden perfection. Topping it with the creamiest, most delicious gravy you have tested. Some may even state that the gravy is the soundest part 🙂.

Don’t Forget the Gravy!

There are a few mysteries to the best Chicken Fried Steak Gravy.

  1. Do NOT scrape the skillet. Leave all of that goodness in there. Just removing the grease and adding back in near enough to make the creamy gravy.
  2. Letting the flour cook and browning it fully before adding liquids. Now, this makes up taste and eliminates that raw flour taste.
  3. Gently whisk  the milk and cream. This prevents lumps and you finish up with a smooth, creamy Chicken Fried Steak Gravy.
  4. Seasoning at the end. My gravy normally does not require any extra salt.

Tips for the Best Chicken Fried Steak Recipe

  • It is not necessary to deep fry. I surface fry to golden yellow perfection with a cup of oil. I like to use vegetable oil.
  • A hefty skillet works better. I use my favorite cast iron skillet but any big, hefty bottomed skillet will work.
  • Do not crowd the pan. Preheating your oven to 225-250F. Keeping it warm and crispy when you are making the gravy.
  • Buttermilk brings the steaks nice, soft and the TABASCO® Sauce adds plenty of flavor without making it extra spicy.
  • You will see the baking soda and baking powder in the breading. This makes it a excellent crispy coating. You will not find it in other recipes.
  • After breading the cube steaks, truly pressing the flour in. You need the steaks to be fully coated with the breading.
  • Do not flipping the steaks more but just once. Waiting until they are nice and golden yellow brown before flipping. You don’t want to spoil that crunchy coating.

How To Make Chicken Fried Steak

The Ultimate Chicken Fried Steak

The Ultimate Chicken Steak is to give it golden yellow perfection. Then completed with the creamiest gravy you can envision. It’s difficult to imagine a more ideal Southern meal. The tough part is settling whether you like to make it for breakfast or dinner.

Course: Breakfast, Dinner 

Cuisine: American 

Keyword chicken: fried steak, country fried steak 

Prep Time:10 minutes

Cook Time:15 minutes 

Servings: 4

Calories: 956kcal 

Ingredients

Chicken Fried Steak Gravy

Instructions

  • In a surface bowl, whisk jointly flour. Then, one teaspoon of black pepper, one teaspoon of salt, paprika, onion powder, garlic powder, baking soda, and baking powder. Set aside.
  • In a separate surface bowl, whisk jointly buttermilk, TABASCO® Sauce, and eggs. Set aside.
  • Pat cube steaks arid with a paper towel, extracting as much moisture as possible. Mix with one teaspoon of salt and pepper. Allow it to sit for 5 minutes and pat parched likewise with a paper towel.
  • Dredge the cube steaks in the flour mix. Dazing off excess, then dredge the buttermilk-egg mixture. Letting extra drip off, and then onetime again in the flour mix, nodding off excess. 
  • Put breaded cube steaks on a sheet pan or metal shelf. Then, push any of the remaining flour mixes into the cube steaks. Make certain that the whole steak is fully in cover. Allow it to pose for 10 minutes.
  • Preheat the oven to 225 to 250 F.
  • Meanwhile, heating vegetable oil in a hefty skillet or big cast-iron skillet over medium-tall heat. How much oil do you want leanson the size of your skillet? You like it to be about 1/4-inch deep. 
  • Try the oil by dipping a bit of the breading into it. The oil should sizzle and bubble near the breading. Looking for the oil to be glowing but not smoking – about 320-340 degrees F. Directly we’re ready to fry.
  • Put two steaks into the pan at a time and fry for 3 to 4 minutes on per side or until it is golden brown. Do not reverse more than once or the breading will dropoff. Do not fry more than two steaks. Else the pan will be too congested and the breading will dropoff. 
  • Extractsteaks from pan and gutter on paper towels. Spotin preheated oven. Shift skillet heat to medium.

Fried Chicken recipe, everything you need to know

0

Chicken is among the desired meats throughout the world. And hither is a dish that nevermore displeases. Fried Chicken is one of the simplest dishes that you can perform at home with your loved ones. Hither is how you can do it in just 4 easy steps. Catch a look.


How about liking some warm and crispy fried chicken. Also, when watching your pet series, seems exciting, right. So, we have an easy yet tasty recipe. You can make Fried Chicken for your home. Hence, not putting in much energy and giving away with the online order trouble.

This genuine Fried Chicken is a tasty and mouth-watering relish recipe. It is made with chicken, soaked in buttermilk, and covered in all-purpose flour. This covered chicken is finely mixed with salt, black pepper, and paprika.

This dish is perfect for events like kitty parties, game nights. You can also make this sweet-smelling chicken recipes on birthdays and anniversaries. This easy yet tasty Fried Chicken recipe is a feast for meat fans.

Ingredients for Fried Chicken

Marinating and Breading the Chicken

  • 1.4 kg chicken, cut into 10 pieces
  • 1 cup (240 mL) buttermilk
  • 1 Big egg
  • 2 cups (200 g) all-purpose flour
  • 2 quarts (1.9 L) vegetable oil, for roasting

Seasoning

Serves 4

Part 1: Gathering the Spices for Seasoning and Breading for Fried Chicken


Mix all of the spices in a food processor till they are of same size.
 

This involves celery salt, garlic salt, and kosher salt. Also, your dried herbs, ground black, and white pepper, dried mustard, and paprika. Continue to pulse the ingredients till the herbs are cut up in the same size.

  • For a more genuine flavor, add 1/2 teaspoon of Accent Seasoning (MSG) for every 1 pound (0.45 kg) of chicken. MSG is a flavor increaser, however it’s not healthy.
  • If you cannot get oregano or thyme, trying marjoram and sage instead.

Speed the spice mixture into the flour. 

Empty the flour into a big dish, then combine the spice blend. Speed the ingredients collectively till everything is mixed. Place the bowl down for later.

  • You will have to place your chicken crumbs in this. The bowl should be large to apt at least 1 chicken breast or 1 chicken thigh.

Beating the egg and buttermilk in a different bowl.

Do not join them in the bowl with the flour and spice mixture. Rather, break the egg opens into a separate bowl, then add the buttermilk. Speed the 2 ingredients collectively till the yolk has split up and no strips live.

  • Making sure that the bowl is deep to soak all of your chicken pieces.

Part2: Marinating and Breading the Chicken

1. Cut the chicken in 10 pieces. 

You will require 2 wings, 2 legs (drumsticks), 2 thighs, and 2 breasts. Chop each chicken chest in half so that you have 4 chest pieces in whole. Attempt to use a chicken that is about 3 pounds (1.4 kg).

  • You can also purchase chicken pieces differently. For instance, you could use 10 chicken chests.
  • Leaving the skin on the chicken pieces. This will give it nice and crispy.

2. Marinate the chicken in the buttermilk for 20 -60 minutes. 

If you are low on time, then 20 to 30 minutes will be enough. A complete hour would be more useful, though. Make certain to marinate the chicken on the counter. If you put it into the refrigerator, the cold meat will reduce the heat of the hot oil.

  • Covering the dish with plastic cover to prevent the marinade from spoiling.
  • If it is very warm in your kitchen. Then marinating the chicken in the refrigerator, first. Next halfway from the marinating time, making it to the counter.

3. Dredge the chicken through the flour-spice blend. 

Taking the piece of chicken from the buttermilk. Now, let the excess batter drip off. Put the chicken in the spice-flour mixture, then flip it over so that both sides get covered. Transfer the chicken to a baking sheet.

  • Repeat this step for each piece of chicken. Work 1 piece at a time.
  • Keep the chicken pieces in the buttermilk until you are ready to dredge them.

4. Let the chicken pieces rest on the baking sheet for about 5 minutes. 

Discard any leftover spiced flour. It got into contact with raw meat. Therefore, it is no longer secure to use.

  • Be sure to discard any leftover buttermilk marinade; it’s been contaminated by raw meat, so you can’t reuse it.

Part3: Frying the Chicken

1. Fill a pot or deep fryer with at least 5 inches or (13 cm) of vegetable oil. 

This oil demands to be broad enough. So that you can dip the chicken pieces. Plan on using about 2 quarts or (1.9 L) of oil.

  • You can use another neutral-tasting oil. Ignore olive oil. As the flavor is too strong.

2. Heat the oil over medium-high heat until it is 350 °F (177 °C). 

This might take a few minutes, hence do not step away from the fryer. When the oil starts to heat up, the temperature will rise rapidly. Use a candy-making or oil thermometer to keep track of the oil’s temperature.

  • If you don’t have a thermometer, stick a wooden spoon handle into the oil. The oil is ready once you start to see bubbles around the handle.

3. Fry the chicken in batches for 12 to 18 minutes. 

The breasts and wings will be ready in about 12 to 14 minutes.  The legs and thighs will take about 15 to 18 minutes.

  • The chicken is done when the internal temperature reads 165 °F (74 °C). Use a meat thermometer to gauge the temperature.
  • The oil should be deep enough to ensure even frying, so there’s no need to turn the chicken pieces.
  • Make the chicken easier to remove by placing the chicken into a fryer basket, then dipping the basket into the hot oil.

3. Dredge the chicken within the flour-spice blend. 

Get a piece of chicken from the buttermilk, and let the excess batter drip off. Put the chicken in the spice-flour blend.  Later flips it over so that both factions get included. Assign the chicken to a baking sheet.

  • Duplicate this step per piece of chicken. Act1 one piece at a time.
  • Put the chicken pieces in the buttermilk till you are able to dredge them.

4. Let the chicken pieces pause on the baking sheet for around5 minutes. 

Drop any remaining spiced flour. It gets into reach with raw meat, so it is not too safe.

  • Be certain to drop any leftover buttermilk marinade.  It’s been polluted by raw meat, so you cannot use it again.

Part3: Frying the Chicken

1. Load a pot or deep fryer with at least 5 inches (13 cm) of vegetable oil. 

The oil requires to be profound enough so that you can immerse the chicken pieces. Layout using about 2 quarts (1.9 L) of oil.

  • You can use different neutral-tasting oil. Evadeolive oil, though,  the flavor is too strong.

2. Heating the oil over medium-high heat till it is 350 °F (177 °C). 

This might take a few minutes. Do not move away from the fryer. Once the oil begins to heat up, the temperature will increase quickly. Apply candy-making or oil thermostat to keep a record of the oil’s temperature.

  • If you don’t have a thermometer. Hold a wooden spoon holder in the oil. The oil is fit once you begin to see foams around the handle.

3. Frying the chicken in batches for 12 to 18 minutes. 

The chests and wings will be available in about 12 to 14 minutes.  The legs and thighs will need about 15 to 18 minutes.

  • The chicken is made when the inside temperature reads 165 °F (74 °C). Use a meat thermostat to gauge the temperature.
  • The oil should be thick enough to assure even frying. Hence, there’s no want to twist the chicken pieces.
  • Making the chicken easy to eliminate by placing the chicken into a fryer basket. Next, dip the basket into the warm oil.

Sweet Potato Salad Recipe- How to Make it?

0

Sweet potato salad is the perfect way to lighten up any autumnal dinner or even your Thanksgiving spread. It is packed with all the things we like to pair with sweet potato: feta, dried cranberries, and red onions pair really nicely with the earthy sweetness of the orange superfood.

Sweet potatoes are an excellent source of vitamin A, which helps maintain healthy eyesight and skin. They also contain vitamin C, which promotes bone health and immunity; along with B vitamins such as niacin (B3), riboflavin (B2), and thiamine (B1).

  • PREP TIME: 10 mins
  • COOK TIME: 35 mins
  • TOTAL TIME: 45 mins
  • COURSE: Side Dish
  • CUISINE: American
  • SERVINGS: 2 servings

Sweet Potato Salad Ingredients:

Veggies

  • 1 big sweet potato
  • 1 tbsp Salt
  • 1 tbsp black pepper
  • 2 tbsp Olive Oil
  • ¼ cup Quinoa
  • ⅔ cup Water
  • 2 full cups of Arugula
  • 2 full cups of Dino Kale
  • ¼ cup fresh Basil
  • ¼ cup Walnuts
  • ¼ cup Cranberries

Dressing

  • 1 tbsp Olive Oil
  • 2 tbsp Lemon juice
  • 1 tbsp Honey
  • 1 tbsp Salt
  • 1 tbsp black pepper
  • ½ tbsp Cumin
  • ½ tbsp Garlic powder

Instructions:

  • Step 1: 400° oven preheat. Sweet potatoes and red onion are tossed in oil and salt and pepper on a wide baking sheet with a rim.
  • Step 2: Arrange them evenly in a single layer on the sheet. Bake for about 20 minutes, or until soft. After 10 minutes of cooling, transfer to a big bowl.
  • Step 3: Prepare the dressing in the interim. Mix the vinegar, mustard, honey, and spices in a small dish or a medium-liquid measuring cup. Pour the oil in gradually while continuing to whisk to create an emulsion. Add salt and pepper to taste.
  • Step 4: Combine the dressing, feta, parsley, and cranberries with the sweet potatoes. At room temperature or heated, serve.

Tips or Variations:

  • The sweet potatoes should cool before you combine everything. The rocket will wilt if you put together the salad while the sweet potatoes are still hot in the oven. Instead, wait until they have had time to cool before combining everything. In this manner, the rocket will be fresh when you eat it.
  • The avocado and dressing should be added last. If you make this dish ahead of time for lunch, keep the dressing and the avocado separate until you’re ready to eat. The salad will become drenched with dressing if you add it too soon. Similar to the avocado, it will get dark and bitter if you cut it too far in advance. However, it will be delicious if you add them both at the last minute.
  • Switch things up. Although this sweet potato salad recipe is exactly as written, feel free to experiment! Here are some suggestions to get you going:
  • Fill it out: This salad already has a lot of heartiness from pepitas, avocado, and sweet potatoes. However, you can add some cooked French green lentils, farro, quinoa, or roasted chickpeas to the dish to make it even more filling. Additionally, you could include roasted broccoli, cauliflower, or Brussels sprouts as additional vegetables!
  • Add a sweet component: This recipe’s caramelized sweet potatoes and tangy feta would taste great with dried cranberries, dried sour cherries, or pomegranate seeds.

Nutrients Value:

  • Calories: 376 kcal
  • Fat: 23g
  • Saturated Fat: 4g
  • Cholesterol: 4mg
  • Sodium: 519mg
  • Potassium: 526mg
  • Carbohydrates: 41g
  • Fiber: 6g
  • Sugar: 18g
  • Protein: 5g
  • Calcium: 79mg

To Sum up:

The combination of garlicky roasted sweet potato cubes, feathery baby arugula, tart cranberries, and creamy goat cheese is a winner in our book. This delicious salad combines hearty winter vegetables with lighter greens for a balanced meal. Plus, it’s easy to prepare — just toss everything together and serve with a drizzle of honey mustard dressing.

The holidays are always busy, so we made some protein-packed salads as side dishes at Thanksgiving — including this Sweet Potato Salad recipe. We wanted something healthy but still super satisfying, so we loaded up on veggies and topped them with a tangy dressing made from scratch.

READ ALSO: Chicken Tortilla Soup, how to make it?

Butter Chicken Recipe: All you need to Know!

0

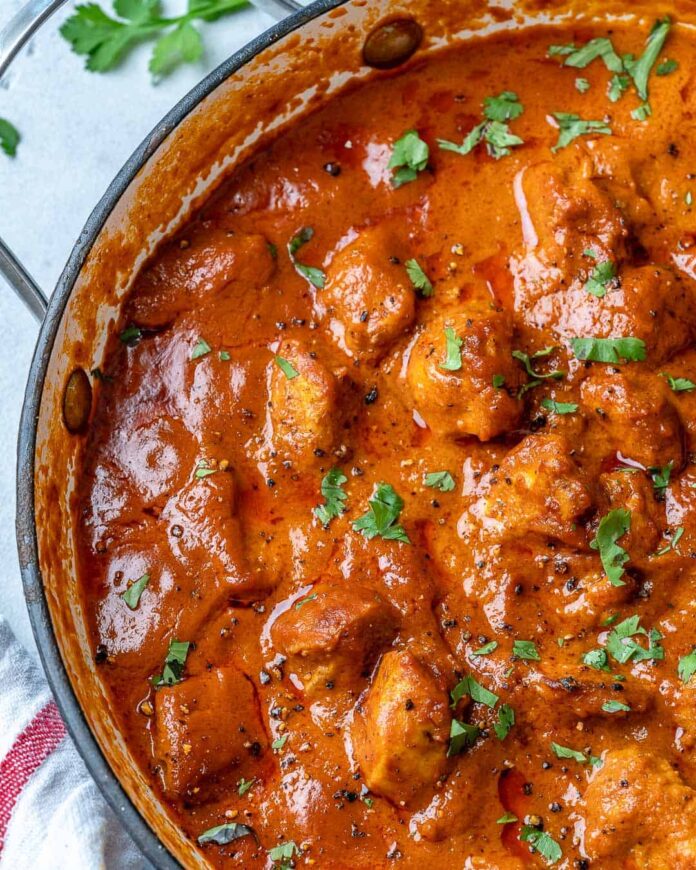
The Butter Chicken recipe needs no introduction. For those who have had the pleasure of indulging in this rich and creamy curry, they know that it is one of the most popular and sought-after dishes at any Indian restaurant around the world. Furthermore, the aromatic golden chicken pieces in an incredible creamy curry sauce make this Butter Chicken recipe one of the best you will try.

About Butter Chicken:

At its core, Butter Chicken is a harmonious blend of spices, herbs, and ingredients that create a delectable flavour profile. The dish is known for its creamy texture and the delicate balance between mild spices and a hint of sweetness. Whereas, it is no wonder that Butter Chicken has become one of the most beloved and popular dishes in the world. For those who are new to the dish, Butter Chicken is a tomato-based curry that is infused with a variety of spices such as garam masala, turmeric, and cumin.

On the other hand, chicken pieces are marinated in a mixture of yoghurt, spices, and lemon juice, which helps to tenderize the meat and infuse it with flavour. The dish is then cooked in a rich and creamy sauce made from butter, cream, and tomato puree. Moreover, the resulting dish is a creamy and flavorful masterpiece that is perfect for anyone looking for a hearty and satisfying meal. Butter Chicken is not only delicious but also incredibly versatile. It can be served with a variety of sides such as naan bread, rice, or even roasted vegetables.

Ingredients:

For the chicken marinade:

  • 800g chicken thighs
  • 1/2 cup plain yoghurt
  • 1 1/2 tablespoons ginger
  • 2 teaspoons garam masala
  • 1 teaspoon turmeric
  • 1 teaspoon red chili powder
  • 1 teaspoon salt

For the sauce:

  • 2 tablespoons olive oil
  • 2 tablespoons ghee
  • 1 large onion
  • 1 1/2 tablespoons garlic
  • 1 tablespoon ginger
  • 1 1/2 teaspoons ground cumin
  • 1 1/2 teaspoons garam masala
  • 1 teaspoon ground coriander
  • 400 g crushed tomatoes
  • 1 teaspoon red chili powder
  • 1 cup heavy cream
  • 1 tablespoon sugar
  • 1/2 teaspoon fenugreek leaves

Instructions:

  • All the ingredients for the chicken marinade should be combined in a bowl with the chicken.
  • Let the mixture sit for 30 to 60 minutes (or overnight if you have the time).
  • In a large skillet or saucepan, heat the oil over medium-high heat. Add the chicken pieces in groups of two or three when they begin to sizzle, being careful not to overcrowd the pan.
  • Just 3 minutes should be spent frying each side until browned. Keep heated and set aside. (You’ll complete the chicken’s cooking in the sauce.)
  • In the same pan, warm up the butter or ghee. The onions should be fried for approximately 6 minutes, sweating occasionally as you scrape off any browned parts that have gotten stuck to the pan’s bottom.
  • Add the ground coriander, cumin, and garam masala after sautéing the garlic and ginger for 1 minute until aromatic.
  • Stirring periodically, let fry for about 20 seconds or until aromatic.
  • Add salt, chili powder, and smashed tomatoes. Stirring periodically, let the sauce boil for 10 to 15 minutes or until it thickens and turns a rich, dark crimson colour.
  • Blend the liquid in a blender after taking it off the heat. To make it mix better, you might need to add a few teaspoons of water (up to 1/4 cup). Depending on the size of your blender, work in batches.
  • Reintroduce the puréed sauce to the pan. The sauce should be well mixed with the cream, sugar, and crushed fenugreek leaves.
  • Reintroduce the chicken into the pan along with any liquids, and simmer for a further 8 to 10 minutes, or until the chicken is fully cooked and the sauce is thick and boiling.
  • Garnish the dish with chopped cilantro and serve with fresh rice and homemade Naan bread.

Nutrition Content:

  • Calories: 580kcal
  • Carbohydrates: 17g
  • Protein: 36g
  • Fat: 41g
  • Saturated Fat: 19g
  • Cholesterol: 250mg
  • Sodium: 1601mg
  • Potassium: 973mg
  • Fibre: 3g
  • Sugar: 8g
  • Calcium: 171mg
  • Iron: 4.1mg

Recipe Notes: 

  • The colour of your gravy would be determined by the quality and type of tomatoes you use.
  • As it is a mild curry, you can alter its taste by using a lot of different spices.
  • Moreover, if you look for a healthy diet only, then look for low-fat butter chicken.
  • Pure chilli powder – This is not the chili powder that Americans are accustomed to! Other ingredients that ground dried chili are present in American Chili Powder. For a spicy spike, use cayenne pepper or pure chilli powder. There is barely any heat at all.
  • Ghee is a clarified butter that is utilized in Indian cuisine (for more information, read this recipe for Movie Popcorn Butter). Moreover, butter or any other cooking oil with a neutral flavour can be used in place of it in this recipe.
  • Tomato passata is just pureed tomatoes from cans. These days, you can easily get it in stores, generally next to spaghetti sauce. It costs somewhat more, and occasionally the same as canned tomatoes. known as tomato puree in the US.

To Conclude:

Finally, this dish is perfect for a cosy night in or for entertaining guests. This Butter Chicken recipe is one of the best you will try, and we take pride in using only the finest ingredients to create a dish that is sure to delight your taste buds.

In conclusion, Butter Chicken is a dish that has won the hearts and palates of millions around the world. Moreover, It is a dish that is not only delicious but also versatile and perfect for any occasion. So, whether you are a Butter Chicken aficionado or trying it for the first time, we guarantee that you won’t be disappointed. Come try this recipe today and experience the magic for yourself.

Lastly, If you have any questions about the recipe or want to share your version of Butter Chicken, please feel free to comment. Don’t forget to share it with your friends and family, I am sure they’ll love it too.

READ ALSO: Pasta Recipe: Made from Cherry Tomato